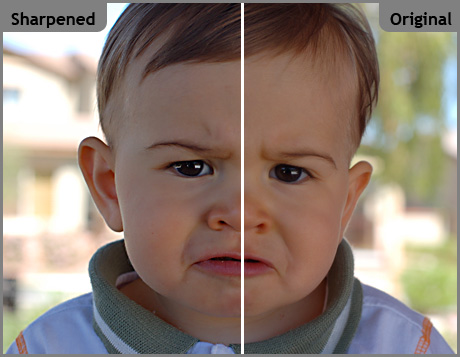
There are more than a few ways to sharpen your digital images. With the release of Adobe Photoshop CS3 we were given Smart Sharpen, a new filter that makes sharpening easy. But I’m kind of old school, and I still like to use Unsharp Mask to sharpen my images. Sharpening an image is essentially taking the part of an image where two colors meet and making the dark areas darker and the light areas lighter. The results are the appearance of a sharper image, and an image with more contrast.  As you can see in the image above, the highlights in the eyes, the details in the shirt collar, and the finer details of the hair are all brought out with just a little Unsharp Mask. However, as you can see by the areas around the ears, it’s easy to go a little too far and end up with a halo effect. When we open the Unsharp Mask filter dialog box, we have the opportunity to adjust how much darker those dark areas get, or how much lighter the light areas get, using the Amount setting. Adjust the Radius to enlarge or reduce the area around that color edge that the filter applies to. Be careful with this one, as you can really get some funkiness if you go too far. Threshold simply determines how much difference in the light and dark areas are necessary before sharpening is applied. PhotographyJam offers some settings as basic starting points for Unsharp Mask. Take a quick look at them and print them out, they can save you a lot of mucking around later. Remember that when you’re sharpening images for newsprint, it’s best to over-sharpen the image just a bit. This will produce crisp, high-contrast results when printing with low-quality newspapers. And don’t forget that you can use the Sharpen Tool to sharpen specific areas of your image simply by painting on the areas of the image you want sharpened. For more info on sharpening images, check out these informative pages:
