 If you’re frustrated with the tiny size of the color ramp area in Photoshop’s built-in Color panel (as seen in the screenshot at the right), you’ll find some much-welcomed relief in Anastasiy’s (a talented Adobe developer) new SWF panel, available for download here. The Color Picker from Anastasiy (available for Adobe Photoshop CS4 only) adds a new, much more useful color picker, at a much larger size (as seen below).
  You can get the same thing in Photoshop without this new tool, but it requires a trip to a dialog box. By using this Color Picker, the tool is available from a regular panel via a click of the icon. To install the new Color Picker, expand the zip file and drop the resulting colorpicker folder into your Adobe Photoshop CS4/plug-Ins/Panels directory. To activate the Color Picker, go to your Photoshop menubar and select Window>Extensions>Color Picker.
 If you find your MacBook or MacBook Pro having various power issues such as:
- backlighting
- hard disk spin down
- sleep or wake issues
- battery issues
- trackpad control
the first thing you should try doing (after simply restarting your computer to see if that fixes it) is resetting the System Management Controller (SMC). The SMC is a chip on the logic board which is responsible for power management of the computer. Issues can and do pop up that render the settings in the SMC unusable, resulting in problems with the above mentioned items. Many times, resetting the SMC is all that is necessary to fix the problems. To reset the System Management Controller on the MacBook or MacBook Pro, do the following:
- Turn the computer off
- Disconnect the AC Adapter and remove the computer’s battery
- Press and hold the power button for 5 seconds, then release it
- Reconnect the battery and AC adapter
- Press the power button to restart the computer
The process is similar for MacBook Air users, as well as users of older Apple laptops which use the Power Management Unit (PMU) rather than the SMC. You can view this Apple support document for more info.
 PSDTuts is offering an exclusive set of 15 Weathered Wood Brushes for download. The brushes, created by Room122, are all high resolution (2500 x 2500 pixels), perfect for use as backgrounds on large print design projects, as well as Web work.
![]() When you want to open a file you’ve placed in Adobe InDesign in its native application, there’s no need to visit the Links panel. Simply hold the Option key down and double click the placed object in your document. This technique will work in Adobe InDesign CS2, CS3, and CS4. It may work in earlier versions, but I’m not sure.
When you want to open a file you’ve placed in Adobe InDesign in its native application, there’s no need to visit the Links panel. Simply hold the Option key down and double click the placed object in your document. This technique will work in Adobe InDesign CS2, CS3, and CS4. It may work in earlier versions, but I’m not sure.
![]() You can quickly make a copy of an object in Adobe InDesign simply by holding Command + Option + Shift and hitting any of the arrow keys on your keyboard. Depending on which arrow key you hit, the copied object will move one pixel in that direction. You could copy (Command + C) and paste-in-place (Command + Option + Shift + V), but that requires two different sets of keyboard shortcuts to use.
You can quickly make a copy of an object in Adobe InDesign simply by holding Command + Option + Shift and hitting any of the arrow keys on your keyboard. Depending on which arrow key you hit, the copied object will move one pixel in that direction. You could copy (Command + C) and paste-in-place (Command + Option + Shift + V), but that requires two different sets of keyboard shortcuts to use.
NeatORama has posted an interesting article, covering where those movie studio logos came from, as well as a breakdown of the logo revisions over the years. 
It’s the age-old question of designers. “Who owns the design you just created for a Web site?” Most designers think they do, while most clients believe it’s work-for-hire and they own it.  Pixelita Designs has an informative article covering the subject titled Who Owns Your Web Site? The article dates back to 2007, but the information is valid, and quite informative. You should also consider the same advice when dealing with print design work as well. The article also features some additional resources on the subject at the end.
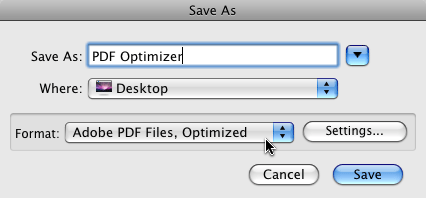
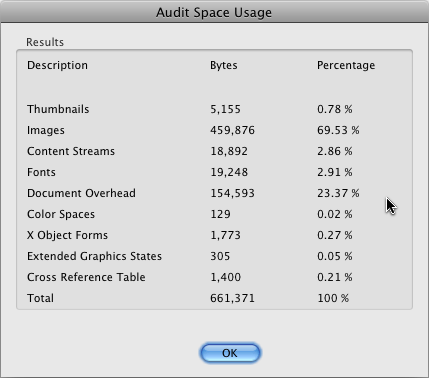
Most people who work with PDFs in Acrobat versions older than version 8 know you can quickly reduce the file size of a PDF by going to the File menu and selecting Reduce File Size. The problem with using that method was that it virtually destroys your images, making them so blurry that you can barely see what they are. Thankfully, with Acrobat 8 and 9, a new PDF optimization method is available. The PDF Optimizer can be found in two places. The first place is in the menubar under Advanced>Print Production>PDF Optimizer. The second, and more handy location, is in the Save As dialog box, where you click the drop-down menu and select Adobe PDF Files, Optimized as seen below.  Clicking the Settings button offers you complete control over how your PDF files get optimized. The first thing to do is figure out what’s taking up so much space in the file. You do this by clicking the Audit space usage button in the upper right corner of the PDF Optimizer dialog box. A window will open offering you a breakdown of what’s eating up all the space (see image below).
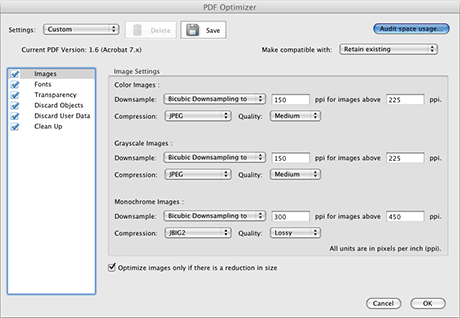
  As you can see in the image above, the images in my test PDF file are what’s taking up the most space, so that’s where I need to focus my attention. Close the Audit window to return to the PDF Optimize dialog box. In the panel list on the left side of the PDF Optimizer you can choose which areas of the PDF file you wish to work with. In the case of my test file, I chose Images. As you can see in the screenshot below, you can downsample your images, select the quality settings, and more.
  This as opposed to older versions of Acrobat where the program just decided for you to reduce everything to the bare minimum. The new PDF Optimizer gives YOU the control and the choice. Selecting other source items such as Transparency, Discard Objects, Fonts, and Clean Up are also available. I recommend you take a look at all of these to see where you might be able to save a few “k” in file size. It all adds up. I also recommend you don’t overwrite the original PDF file, just in case you’re not happy with the results. If you wish to see the PDF Optimizer in action, visit the Acrobat 9 PDF Optimizer page at CreativeTechs, where they have a brief video you can watch to learn more.


