![]() Everybody knows you can go to any particular page in you InDesign document by double-clicking its page icon in the Pages palette, or by typing the page number you want to go to in the little Page indicator box in the lower left of your document window. Of course, there’s always the old Command + J shortcut to bring up a dialog box where you can type your desired page number in. Here’s another page changing tip. Hold down the Option key while double-clicking the page icon in the Pages palette to not only go to that page, but switch the view to Fit Page in Window at the same time.
Everybody knows you can go to any particular page in you InDesign document by double-clicking its page icon in the Pages palette, or by typing the page number you want to go to in the little Page indicator box in the lower left of your document window. Of course, there’s always the old Command + J shortcut to bring up a dialog box where you can type your desired page number in. Here’s another page changing tip. Hold down the Option key while double-clicking the page icon in the Pages palette to not only go to that page, but switch the view to Fit Page in Window at the same time.
When working in your Adobe InDesign document, you can quickly zoom in or out on your page or spread with a few quick shortcuts. Command + Spacebar + Click zooms in on your document page, centering on the area around your cursor. Command + Option + Spacebar + Click zooms out on your document page. Double-click the Hand Tool in the Toolbar, or hit Command + Option + 0 (zero), to automatically fit the page or spread to the screen (obviously, the zoom amount will vary depending on the size of your monitor). Double-click the Zoom Tool in the Toolbar, or hit Command + 1, to view your page or spread at 100%
InDesign’s Master Pages are quite powerful, and make long documents easy to keep consistent. They do have their difficulties though when you try to alter items that are contained on the Master Pages themselves.
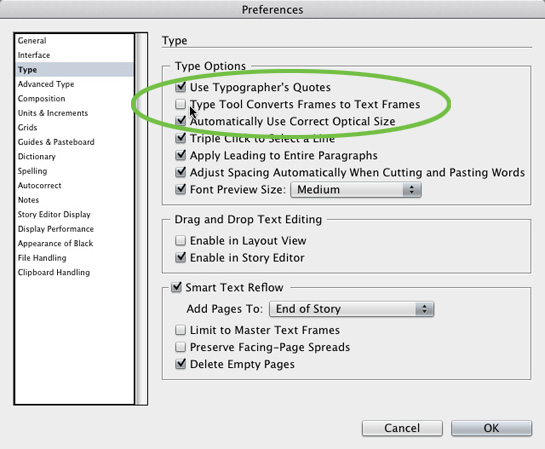
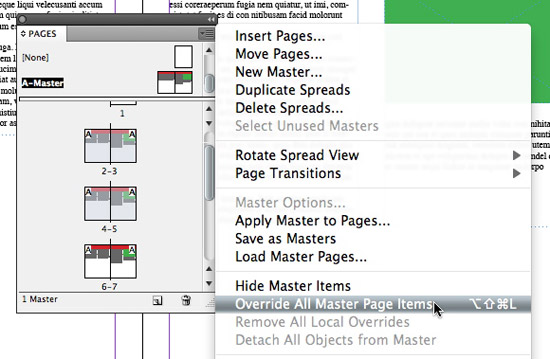
The easy fix is to select all the pages you want to alter the Master Page items on in the Pages panel (Shift + Click to select more than one, or Command + Click to select noncontiguous pages), then select Override All Master Page Items from the Pages panel flyout menu.A feature I love about InDesign is the ability to click any graphic frame with the text tool and begin typing in it immediately. However, not everyone likes their graphic frames converted to a text frame automatically.  For those who wish to turn the feature off, simply visit your InDesign preferences (Command + K) and select Type in the source list on the left. Then uncheck the box labeled “Type Tool Converts Frames to Text Frames.”
![]() If you have an InDesign object such as a text box, or an image frame in your document and you wish to remove any stroke and fill it currently has, you can do it with a quick keystroke. Simply select the object in question and hit the Slash key ( / ). This will set either the fill or stroke to None, depending on which you have active at the time. To remove the color from the other attribute, just hit the X key to switch and hit the slash key again.
If you have an InDesign object such as a text box, or an image frame in your document and you wish to remove any stroke and fill it currently has, you can do it with a quick keystroke. Simply select the object in question and hit the Slash key ( / ). This will set either the fill or stroke to None, depending on which you have active at the time. To remove the color from the other attribute, just hit the X key to switch and hit the slash key again.
![]() Here’s the problem: You have two InDesign documents of the same job which are filled with text – but you don’t know which one to use. You could spend a lot of time reading page after page of text trying to determine which document is the one you want, but there’s an easier way. I picked-up this tip from Anne-Marie Concepción over at InDesign Magazine some time ago and it’s fantastic for comparing two InDesign documents to find the differences. Obviously, this tip is most useful for documents containing a LOT of text. Read on to see how easy it is. READ THE REST OF THIS ARTICLE.
Here’s the problem: You have two InDesign documents of the same job which are filled with text – but you don’t know which one to use. You could spend a lot of time reading page after page of text trying to determine which document is the one you want, but there’s an easier way. I picked-up this tip from Anne-Marie Concepción over at InDesign Magazine some time ago and it’s fantastic for comparing two InDesign documents to find the differences. Obviously, this tip is most useful for documents containing a LOT of text. Read on to see how easy it is. READ THE REST OF THIS ARTICLE.
InDesign offers a plethora of ways to place new photos and graphics into your document. Adobe has also made it simple to replace an existing image or graphic with a new one. To replace an existing photo or graphic, simply hit Command + D (Place) and choose your image as normal. But when you’re ready to replace the existing image, hold down the Option key and click the photo or graphic you wish to replace. The new image will be placed inside the original image container. This is especially useful when you load your Place cursor with more than one image at a time to replace several existing images. If you only wish to replace a single photo or graphic, simply select the existing image first, then go through the normal method of placing an image.
![]() One of the things I love about Adobe InDesign is that there’s usually more than one way to accomplish virtually any task. Take placing images in your document. InDesign offers a plethora of options to improve productivity in this area, thanks to keyboard shortcuts. In my Image-placing shortcuts in Adobe InDesign article at Macworld’s Creative Notes blog, I show you some handy shortcuts for placing single and multiple images into your document using InDesign.
One of the things I love about Adobe InDesign is that there’s usually more than one way to accomplish virtually any task. Take placing images in your document. InDesign offers a plethora of options to improve productivity in this area, thanks to keyboard shortcuts. In my Image-placing shortcuts in Adobe InDesign article at Macworld’s Creative Notes blog, I show you some handy shortcuts for placing single and multiple images into your document using InDesign.


