Twilight Photography Tips
The following post on long exposure shots after sunset was written by Matthew G. Monroe from The Global Photographer.
I’ve never been a huge fan of sunset photos… In fact — to be quite honest — the thought of just hanging around at the beach, along an observation deck, or even on a mountain top simply to take a picture of the sun hitting the horizon seems pretty dang’ boring to me. Oh sure, it can be mighty fun to just hang out with your sweetheart at the beach (MAJOR romance points), and a nice glass of chardonnay while at the top deck of the Seattle Space Needle — Perfect!
But the simple fact is that most sunset photos end up looking like — well — just about every other sunset image that’s out there: a big reddish-orange ball hits the horizon, while nearby ridgelines, trees, pets, and romantic couples all get turned into dark silhouettes. Aesthetically, it might all look quite good, but usually there’s nothing to differentiate any one particular image from the millions of other sunset shots that are out on the web (or in your grandparents old collection of slides).
The Secret to Great Sunset Shots
Sooooo… What can you do to make your sunset shots stand out? What technique can you make use of that will make your sunset images stand out from all the gazillions of other beach shots, palm tree shots, observation deck pictures, and mountain top photos that are out there?
Simple… Don’t shoot the sunset.
Instead, take your pictures long after the sun has set.
Looooooooong after the sun has set.
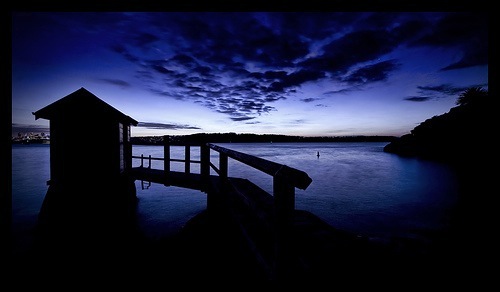
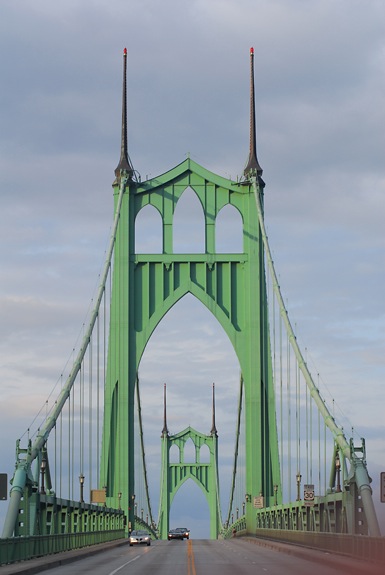
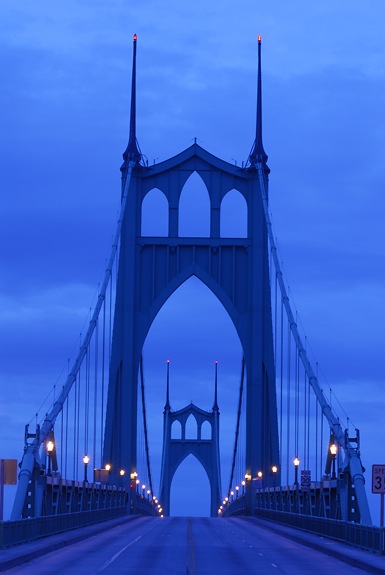
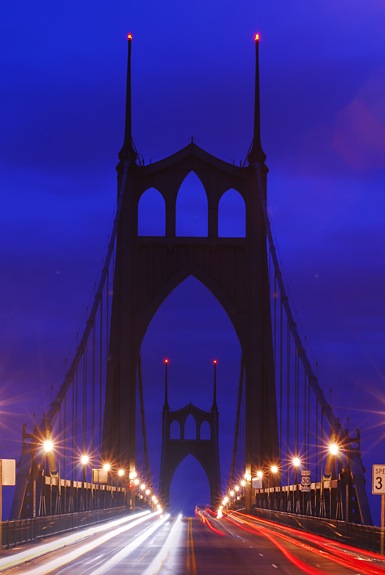
Though you might not end up with the most technically polished of images, you’re almost guaranteed to have a more interesting “sunset” image if you wait about fifteen to twenty minutes after the sun has dropped below the horizon before actually snapping a picture. Your results may vary, and it could take as long as forty minutes after the sun sets before any magic really happens, but for those photographers with a rock steady tripod, a fully charged battery in the camera, and a good amount of patience, rather creative images can be created in some of the most unlikely of places. For the sake of this article, I’m using a series of photos that I shot near my own hometown (the Portland, Oregon area) of the very stylish and architectural St. John’s Bridge. I won’t make any claims about these images being award winning — but they should illustrate both my point and technique rather well.
How to Shoot Great Twilight Shots
Okay… How to begin… First off, be prepared for the location/environment that you’ll be shooting in. Myself, I always keep a small battery powered headlamp in my camera bag because — well — it’s just a good common sense sort of thing to do. A small flashlight or headlamp sure makes it a lot easier to find any CF cards that might get dropped in the dark while doing a card change (or so rumor has it). Also, be sure to dress for any weather and temperature shifts that might take place after sunset. At high altitudes, the temperature drop that takes place just after the sun drops is shockingly fast and extremely dramatic.
A very smart thing to do (if you’ve got the time and patience) is to get to your shooting location at least ten minutes before the sun actually sets. This will give you some time to look around and — more importantly — will give you time to actually think about what it is you want to shoot. Examine your environment. Is there some interesting architectural feature nearby? Any moving water? A gnarled old tree? Think about your framing and your lens choice. In that big ol’ mind’s eye of yours, run through various focal length options that you have — from telephoto to wide-angle.
Okay, you’ve got a basic mental image of the shot going… Now pull out your camera and start doing some rough test shots just to see if the framing you’ve imagined will actually work out. It will? Great! Now pull out your tripod… Set your camera up on the tripod… Get the final framing that looks most interesting to you… If you have a shutter release cable (always a good idea for long exposures) get it hooked up while you still have some light out. Put your camera into Full Manual mode (i.e.: YOU have to set aperture, shutter speed, ASA, and white balance). Set your ASA as low as it will go (typically ASA 100). Set your f-stop somewhere between f8 and f13 — it’s your choice. Lock focus on the portion of the image you think is the key element. Check your focus. Check it again. Now, turn off the Autofocus .
Let me repeat this: Turn your Autofocus off..
Now just sit back, get a nice cold (or hot) drink, and take a gratuitous photo or two just for fun. If you have your camera pointed towards the actual setting sun, be sure to keep the lens cap on when you’re not shooting, as the sun’s focused rays hitting your viewfinder screen can do some really nasty things to your camera.
Sit back some more.
About ten minutes after the sun has gone done, do a test shot with your camera just to see how things are looking. Chances are good that the results will be pretty dull and awful (see my photo below). Don’t worry — you’re taking this shot just to confirm that your camera is working, that your framing is good, and that you can adjust your camera manually to compensate for the rapidly encroaching darkness. About ten minutes after sunset, with an aperture of f8, you’ll probably need somewhere between 1 and 3 seconds of exposure time.
Fifteen minutes after the sun has gone down take another picture. Looking better? It should… You’re working your way towards the truly magic sorts of photos that can only take place long after the sun has set.
Now, start thinking about your white balance. If you’re the kind of person who usually shoots in RAW mode then this won’t matter all too much, but for myself — when shooting strictly JPEGS — I play around with my white balance quite a bit, using my camera’s LCD screen to judge color and contrast. I will often drop my white balance down to about 2800 degrees K. just to increase the saturation of my blue tones.
Okay, now it’s about eighteen or nineteen minutes past the sunset… Start clicking away, and really examine your pictures to see if you’ve picked an appropriate white balance AND that you’ve got a good exposure going. Remember, you’ll need to adjust your exposure time manually in order to make this all work out, but at some point you’re going to hit the sweet spot and it will be obvious when you hit the sweet spot. Typically, when you find that an aperture of f8 and an exposure time between 15 and 30 seconds gives you a good looking picture on the back of the screen, then you’ve most likely found the sweet spot — but keep taking pictures.
Let me repeat this: KEEP TAKING PICTURES!
In my experience, there’s only about a one minute window during which really cool, really interesting, and (if you’re lucky) truly jaw-dropping images can be created after sunset — and this usually happens somewhere between twenty and twenty-five minutes after the sun drops below the horizon. It’s important that you keep snapping away with your camera (and keep adjusting your exposure time) because — well — you’re trying to capture a very specific (though fleeting) moment. Trust me, when you capture that moment you’ll know it almost immediately — though you should also keep clicking away even when things start to look dull again on the back of your screen. If there’s a rising moon (you did check to see when moonrise was, right?) you might find yourself back at that sweet spot in a short while. Myself, I’ve had a series of sunset images go from dull to interesting, back down to dull again, and then up to really, really, really interesting because of a rising full moon.
Again, your results may vary — heck, will vary — and so it’s best to have a lot of patience when doing all this. If, after about an hour has passed and you find yourself becoming cold, hungry, or bored (or all three), then it’s time to pack it all up and head on back to your home, hotel, campsite, friends, spouse, children, and/or pets. Try not to bore anyone with tales of your exploits. Just pull out your camera — don’t say a word — and start showing the people around you some of the really cool photos that you just took. Everyone will want to know how you did it.
Read more posts like 'Twilight Photography Tips'


An informative article (finally!). Something I didn’t really consider.
Great article - something I have not tried before. The pics - especially the first one are amazing.
bravo!
very well written
will definitely try this out soon
Exactly what I did 2 days ago. Having some clouds is always nice, because usually after the sun sets, they have awesome colors. If it was a clear day, you usually get orange and reddish clouds, which look like their on fire.
Two days ago, I had a misty day and I got out for sunset pictures. Colours turned out more orange, violett and blue.
These are just awesome color combinations.
Thanks for the good article, Matthew; I particularly like the last shot.
That is a great tip, but it is also good to remember that the closer you are to the Equator, the more compressed dusk will be.
I currently live about 5˚ South of the Equator, and once the sun sets it is about 15 minutes until complete darkness.
Great article, definitely something worth trying…when the weather warms up a bit! One question…how is it that you’re positioned right in the middle of the road? Are you zoomed from a far distance?
Everyone: Thanks so much for the kind words. Darren — the Digital Photography School guru — had asked me to come up with an article that was technical in nature though not TOO technical, and I hope that I was able to do just that with this piece.
Denise: When I shot the St. John’s Bridge, I was kinda’ standing in the middle of the road, though safe and secure on a small highway divider right at the entrance to the bridge deck. Not scary at all… My lens? An older zoom (the Nikkor 70-210mm) set at 70mm.
Matt
I love that last shot most of all. I was wondering too about where you were actually located since I’m pretty sure you weren’t sitting in the middle of traffic, but it sure looks like you were!
I’m interested in the focal length to, as the EXIF only says it’s at 105 mm or so. Maybe an island in the middle of the road?
If you shoot in RAW you can always get the perfect white balance in post production. I did some pretty hefty WB adjustments on this photo to get the sky to have a blue/purple look..
http://www.flickr.com/photos/dmcgrew/2139112655/in/set-72157603556139271/
I have taken a few twilight photos recently (http://www.flickr.com/photos/brettdickson/tags/twilight/). I live the balance between natural and artificial light that can be achieved at this time of day. For me the best time after sunset depends to a large extent on location (a valley will be darker than a ridge top), the amount of cloud cover, and the subject.
You forget one thing, how do you avoid getting run over by cars? Did the road take a sharp turn between you and our view? Great shots, looking forward to taking some of my own.
Thanks for a great article. Being on the west coast of Florida, I am guilty of taking MANY sunsets. But I, too, love it most after the sun goes down and the sky goes through that beautiful evolution. Now that I’m breaking out of “snapshot” mode and capturing images instead, I will be scouting out some spots to give this excercise a go!
Thanks for this great article. Makes me want to go right outside and do some night shots right now … but, um, it’s about 8 degrees F out there. Maybe in a few months. :-)
One quick thought. If you make your aperture quite a bit smaller (like f22 or some big number like that), requiring a longer exposure, you can get some nifty star-sparkly things around lights. I don’t understand the science of it … I think it has something to do with the number of metal blades around the iris or something. (Can anyone explain that?)
Here’s an example. I took this shot in December of 2006, the aperture was f/25 and the shutter speed was 25 seconds. http://photo.net/photodb/photo?photo_id=5338893&size=lg
Beautiful. I appreciate the insight and the advice - this is something I have been looking to do for a while, and these turned out wonderful. Thanks.
Great article on how to get amazing results. I’ll have to put these techniques to good use shortly.
great article … thanks for the info and comparison.
i agree that shooting after sunset is good, because cameras can pick up light with longer shutter speeds.
thanks for sharing.
cheers
david
http://www.davidsmeaton.com
This was a really great and informative article,I really need to try this out as soon as possible! Thanks for a really great article Matthew.
//Christer
Awesome article, thank you!
Thanks for the great article - twilight is truly the best time for photography in my opinion.
Great article - thanks!!!
Peter
Great article! I’m really excited to go try your helpful tips on night photography. Thanks!
I’ve shot a very similar photo as the first one on this entry:
http://flickr.com/photos/piqquam/2206676784/
Great article. Usually after the sunset, people immediately rush home to look at the results from a bigger screen and they miss all the beauty that’s happening in the next hour or so.
Thank you for sharing your insights. Very helpful.
Thanks for the great article. I am looking forward to warm weather so I can try this techinque.
just as a quick tip, one that I’m sure many of you had heard before:
as I don’t own a cable shutter release and I don’t plan in buying one for my aging dslr I use timed release:
I set the camera for the 2 seconds delay and so the shutter triggers by itself after my hand is off the camera.
Great Article.
I was thinking about the best way to take pictures after the sun was down - last night while I was helping my husband fix the snowblower behind the tractor… so we could escape our yard again.
The sky was amazing… the colours were great! Unfortunately - while fixing machinery at -35 Celcius… its not the perfect time to be snapping pics!
Most of my decent “sunset” photos have been pure accidents. I can never seem to get them to come out when I actually “try”. This was very informative and should help a lot. Thanks Matthew.
Loved the article. The times around sunsets and sunrises are so rewarding to photograph. A lot of weather elements have to come together for a photo to really stand out, but the main thing is the timing! I’ll never forget some of the ones that got away last year; running out the door with camera in hand to see that I was seconds too late.
WOW! I love how those turned out and I hadn’t really thought to continue taking pictures AFTER sunset. It’s only 9 am and I already can’t wait for the sun to set again so I can try this! hehe
LOVE those ideas!! Thanks!!!!
Beautiful,
I will try.
Everyone: Again, thank you so much for the kind words about my article. This was the very first piece that I’d written specifically for Digital Photography School (thank you Darren) and I’m just hoping that any future articles which get published will be as useful and informative to you readers.
Karl: You are very, very correct. Near the equator, sunset (and darkness) takes place really, really fast. Heck, I should know this, I’ve actually been down to the Amazon… Also, if you’re up in Alaska during the Summertime, sunset — if it takes place at all — takes place very, very slowly. Obviously, adjustments do need to be made in regards to lighting conditions created by latitude and seasons.
Canadian Mum: Cold weather shooting? As long as it’s not windy outside I love shooting in the cold. If you head on over to my blog (http://theglobalphotographer.blogspot.com) and do a search using the phrase “cold weather,” you’ll find a posting that I recently wrote which features some of my tech-tips for cold weather work.
Matt
Great advice for people who can’t quite figure out how to do it. I’ve been doing twilight photography for years, and I do everything you mentioned. Usually after the magical twilight time, I will continue on and do some nighttime photography. All great fun. You have to take many shots. Eventually you will figure it all out. I often go back to the same spot and take photos over and over again until I get just the one I want.
Very useful and informative.
Martin
Great article! Just one question, though. Is ASA the same as ISO or is it a totally different feature of a digital cam? Thanks.
I agree sunset shots can be really boring. I loved the series taken of the bridge. Great examples of creative evening photography.
Wonderful shots! Very interesting to see the progression. Thanks for the tips on manual exposures.
Very good post. Great article and usefull too.
I read this article and had to try it out. Last night I went out after work and got set up about 30 minutes before sunset. I kept snapping until 40 minutes after the sun disappeared. I was getting cold in the minus double digits here in Ontario so I headed home - I would have liked to stay out longer.
The result is here
http://www.flickr.com/photos/richardsiemens/2264380146/
with a bit of writeup here
http://walkinfridge.blogspot.com/2008/02/baby-its-cold-outside.html
Not a super-shot, but I like it nonetheless.
i always find this type of photography challenging. thanks for the tips.
I just did shots like this over the weekend, very very dark place (like the forest, desert) bring a very bright light to shine on your subjects, I had a very hard time focusing on the tree’s, and ended up scrapping most of my shots.
What do you mean by turn autofocus off? You strongly emphasize this. I’m a little confused as my D50 autofocuses with all my lenses.
Sorry if I sound ignorant….. any explanation is appreciated!
Thanks!!
Really informative piece, thank you very much.
Great article. I have not done much after sunset but now have an itch to try it. I have always liked the blue/brown tone of images taken at night with a long exposure.
Matt,
Kudos to you on a very informative article. I especially like that you included photos in series with your paragraphs illustrating the moment.
I also appreciate that you updated the comments to explain where you were standing (in the median) and including the specifics on your focal length.
Have a great weekend and happy shooting to all.
- Rob -
Great article.
Your opening comments regarding every sunset looking like every other sunset and how boring it is, is to me, like saying “you know what I don’t understand? Why is it that everyone takes pictures of beautiful women. I mean every beautiful woman looks the same as all the other beautiful women….bor-rinnnng. Stop taking pictures of beautiful women!”
A few folks have asked about focusing their camera during night shots, and why I put so much emphasis on turning the Autofocus off. The simple reason is that — when it starts getting dark outside — Autofocus is pretty dang’ close to being useless. It’s better to get to your established shooting location, set focus while you still have light out, and then turn your Autofocus off.
What to do if it’s too dark for setting Autofocus? Simple… Look on the side of your lens, and set a guestimated distance between you and your main subject by just dialing it in. It’s not the most accurate way to set focus, though it should get you right in the ballpark. If you’re on a relatively wide lens and at around f8 or so, you’ll have a ton of slop to play with.
I was also asked why I think that sunset photos tend to be boring — and then an analogy was made between shooting sunsets and taking pictures of beautiful women. Quite honestly, if all I did was shoot headshots of beautiful women — with the same general lighting, positioning, and framing every day — I’d find that to be pretty dang’ boring, no matter how beautiful the women were. On the other hand, by adding variance to the shots (different lighting techniques, framing, exposures, etc) and making those variances a way of enhancing the mood and feel of the images, well, that’s how interesting photos are created.
Fantastic article and very informative
A very interesting article…
But tell me, what exactly is the difference between Twilight and Dusk??