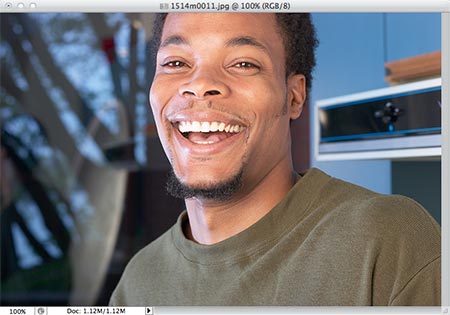
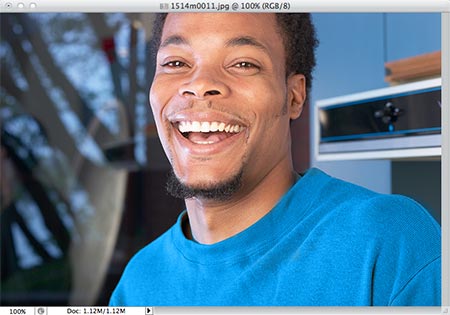
 The Color Replacement Tool is often overlooked by many designers… mostly because it’s a relatively new tool, and partly because it’s somewhat hidden where you wouldn’t expect to find it. It’s not a terribly difficult tool to master, and using it once will show you how often you *could* use it. In Adobe Photoshop CS it is bundled with the Healing Brush tool (another tool many people tend to “forget to use”). In Photoshop CS2, Adobe decided that it needed to be moved next door to the Brush Tool (see image at right). No matter where you happen to find this little bugger, you’re going to love what it can do for you. Lets say you want to change the color of the shirt in a photo to better match your layout. Many folks would spend a lot of time making a mask or clipping path, create a new layer and paint a color over top of the shirt, then adjust the layer transparency settings. Still others would just use Selective Color under the Edit>Adjustments menu and hope that it didn’t alter the image too much. These and other methods work fine, of course, but take much more effort than is necessary.
  To use the Color Replacement tool, choose a color to make the shirt. Then click on the Color Replacement tool icon in the tool bar. Then you’ll need to make some quick adjustments in the Options Bar. First, click the Brush size icon and adjust your brush settings. You’ll want to use a larger brush with a soft edge. Be careful not to make the brush too large though, you want to keep some control.
 ![]() Second, make sure you select Contiguous from the Limits pop-up menu and you set the Mode to either Color or Hue. These are the three main adjustments that need to be made. You can also adjust the Tolerance, but try working with the tool a little first. Now comes the fun part. You should now see the round outline of your brush with a little crosshair, just start painting over the area you want to color shift, being careful not to let the crosshair touch any color you DON’T want to shift (if it touches any other color, it will shift that color as well).
Second, make sure you select Contiguous from the Limits pop-up menu and you set the Mode to either Color or Hue. These are the three main adjustments that need to be made. You can also adjust the Tolerance, but try working with the tool a little first. Now comes the fun part. You should now see the round outline of your brush with a little crosshair, just start painting over the area you want to color shift, being careful not to let the crosshair touch any color you DON’T want to shift (if it touches any other color, it will shift that color as well).  Now that you see how easy it is to use and how well it works, play with the color modes, tolerance settings, etc… I think you’ll find it to be quite a useful tool not only for changing colors completely, but simply color correcting them as well.
Color shifting and replacement in Photoshop
Adjust your raster effects settings in Illustrator
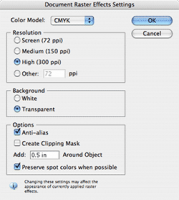
 You may not know this, but when you use raster-based effects or filters such as drop shadows, etc. in Adobe Illustrator, the default for the output of those effects is a low-res 72 dpi. When using Filters, you must change the raster settings BEFORE you apply the filter. When using Effects, you don’t have to adjust the raster settings until you’re ready to save the file for output. You can access the Document Raster Effects Settings under the Effects menu.
Closing all layer groups (folders) at once in Photoshop
Did you know that you can close more than one layer group (folders) at a time in Photoshop’s Layer palette? You can with just two quick steps. Control + click the arrow on the left side of a Group layer (folder) in the Layer palette and choose Close All Other Groups. Now you’ll have to Control + click click the same arrow again and select Close This Group, because Adobe didn’t provide us with a “Close All Groups” menu item.
Rotate objects in InDesign more than once
Did you know that if you click on the rotate icon in the Control palette in Adobe InDesign, which selects the text for the field, and enter a number, then hold the Shift key down and press Enter, the rotate input field stays highlighted so you can type in another amount for the object to be rotated – allowing you to get the rotation amount just right without having to go back to the Rotate icon again. Of course you could just free rotate the object by selecting it and hitting the “R” key and dragging the handles of your object, but it’s difficult to be precise using Free Rotate.
Tips for digital photography beginners
 If you’re new to digital photography (welcome aboard!), Canon has a nifty little site that discusses all the basics about your digital camera (regardless of the brand) and how to take great pictures. Some of the topics covered are:
- Bright & dark shots
- Controlling depth of field
- Freezing or blurring motion
- ISO speed effects
- Creating depth
- Setting image quality
- Focusing a moving subject
- Shooting dark subjects
- Shooting bright colors
- Using white balance
Again, this site is mostly for beginners, but there may be some interesting tips for hobbiests who simply refuse to read their camera manual! ![]()

