I’ve posted a short review of Paparazzi!, a fantastic little screenshot application, over at CreativeBits. If you often find yourself piecing together screenshot images to give the appearance of a full page screenshot, then you’ll definitely want to give this review a quick read.
Backing up your iPhoto libraries
![]() One of the things I disliked about iPhoto in the past is that it was a bit of a pain to backup your carefully organized photo libraries from the Finder. But there is a simple solution if you’re running older versions of iPhoto. You can backup individual libraries in iPhoto simply by selecting the library or film roll you want in iPhoto and going to File>Export and select a folder (or create a new one) to place a copy of the photos into for backup purposes. This folder can reside on the main drive, an external drive or server. Thankfully, with version 6 of iPhoto, Apple has made it easier to make sensible backups via the Finder. First, visit your ~/Pictures/iPhoto Library folder. Inside that folder you will likely find a few folders worth noting titled “Originals” and “Modified.” These folders contain more folders which are named according to the film roll name in iPhoto. This makes it very easy to find the specific photos you wish to backup. Obviously, the modified folder contains copies of the images you have modified through iPhoto’s built-in tools or through an external editor.
One of the things I disliked about iPhoto in the past is that it was a bit of a pain to backup your carefully organized photo libraries from the Finder. But there is a simple solution if you’re running older versions of iPhoto. You can backup individual libraries in iPhoto simply by selecting the library or film roll you want in iPhoto and going to File>Export and select a folder (or create a new one) to place a copy of the photos into for backup purposes. This folder can reside on the main drive, an external drive or server. Thankfully, with version 6 of iPhoto, Apple has made it easier to make sensible backups via the Finder. First, visit your ~/Pictures/iPhoto Library folder. Inside that folder you will likely find a few folders worth noting titled “Originals” and “Modified.” These folders contain more folders which are named according to the film roll name in iPhoto. This makes it very easy to find the specific photos you wish to backup. Obviously, the modified folder contains copies of the images you have modified through iPhoto’s built-in tools or through an external editor.
Photoshop sharpening tips for designers
Virtually every image you bring into Adobe Photoshop—whether it be a stock image or from a scanner or digital camera—will need at least a little bit of sharpening. This is just something we, as designers, have to deal with in the digital age. Many photographers will balk at such a statement: if they’re good and take pride in their work, the photo is close to perfect in their eyes to begin with. However, once the photo is brought in to your Mac and your image manipulation is complete, a loss in sharpness is almost always present, no matter how perfect the original photo, negative or slide was. A recently published article at Macworld.com titled Photoshop Sharpening Tips for Designers offers some tips for sharpening your images.
Learning the language of typography
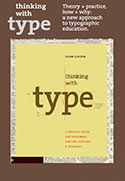
 If you would like to know more about typography, the meaning of terms used with regards to type (such as tracking, kerning, leading, x-height and more) and a little type history lesson thrown in for good measure, then check out Thinking With Type. For more in-depth discussion about type and some general “rules-of-thumb” you can check out Learn Typography and Page Layout. They have a great page that discusses some dos and don’ts of setting type.
Get better .eps preview images from Photoshop
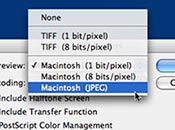
You may have noticed that if you save .eps images from Photoshop, when you place them in InDesign, Quark or other layout application, the image is jaggy to outright ugly. This is because the .eps image is using the default preview mode of 1 bit/pixel (or 256 colors).  You can get beautiful full color/full resolution preview images in your .eps file simply by changing the Preview setting when you save the .eps image. Simply select Macintosh (JPEG) from the Preview: drop down menu. No more jaggies! Never use the TIFF preview image option. It seems to cause a lot of problems with RIPs at service bureaus, printers and publications when outputting.
Getting multiple line-breaks in iChat
![]() Here’s a clever little shortcut for iChat. Ever wish you could send a few lines of text in iChat with space between them? Well if you’ve tried to hit return or enter, you probably just sent the message. You can easily have multiple line-breaks where you want them by simply hitting Option + Enter when you want to force a line-break.
Here’s a clever little shortcut for iChat. Ever wish you could send a few lines of text in iChat with space between them? Well if you’ve tried to hit return or enter, you probably just sent the message. You can easily have multiple line-breaks where you want them by simply hitting Option + Enter when you want to force a line-break.

