Archive for April, 2010

Access your iPhoto collection in an application’s Place or Open dialog box

Access your iPhoto collection in an application’s Place or Open dialog box

When Leopard was released, a little-hyped feature was the ability to access your iPhoto, iMovie and iTunes assets from within virtually any application’s Open, Insert or Place dialog box.

Because it’s a feature you don’t use every day, it’s easy to overlook it – but it can save so much time that I’m surprised I don’t hear or see more people using it. Previous to Leopard, you could use Karelia’s free iMedia Browser to get the feature in Mac OS X Tiger (10.5) or Leopard – including any application that doesn’t support Apple’s built-in method. But in my day-to-day work, I’ve yet to come across an app I need it for that the built-in method doesn’t work in.
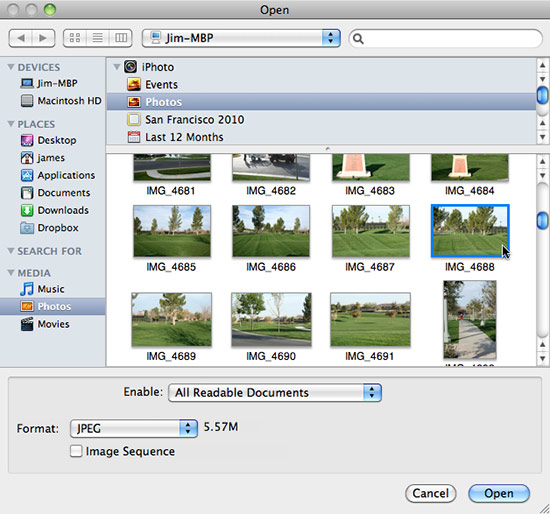
Access iLife assets in virtually any app

You simply need to click on the appropriate Media icon in the left-side source list of an Open, Place or Insert dialog box. The appropriate database will appear at the top of the window allowing you to access your library of assets, and offer previews of your assets below it. In the case of the screenshot above, I’m accessing a specific collection of images in my main iPhoto library from within Photoshop. No need to open iPhoto and drag the image to the desktop before opening it in Photoshop. The same method will work for bringing iMovies into Final Cut or your favorite video editing apps, etc.

You can still use Karelia’s iMedia Browser if you come across an app that Apple’s built-in method doesn’t work with. The nice thing about it is that it’s a stand-alone app that you can keep open and drag images out of whenever you wish.

04/30/2010 Read More
Web browsers on the Mac: They all suck, except for Chrome

Web browsers on the Mac: They all suck, except for Chrome

Google ChromeWith the recent update to Opera 10.5 for Mac OS X, I decided it was time to take a look at all the major Web browsers for Mac OS X.

I’ve been using Google Chrome (developer builds, not the betas) for quite some time now, and made it my default browser within hours of installing it. Nevertheless, I’m going to remain unbiased in thoughts.

Below is my extremely thorough review and expert advice for which Web browser you should use in Mac OS X.

Chrome (most recent dev build or beta version)

Uber fast to launch. Smokin’ fast browsing speed. Compatibility is nearly perfect, but there are a few sites it doesn’t work with. Expansion via extensions is pretty good, and getting better every week. Frequent updates and improvements make it more fun to work with lately. The clean interface coupled with the speed make this my favorite, and you should use this as your main browser!
Download: Release Version | Beta Version | Developer Build

Safari 4.0.5

Looks great. Quite speedy. Completely lacks any usefulness beyond just surfing pages randomly. With no expansion opportunity beyond a few really crappy plugins, it’s feature-starved. Make it your backup browser though.
Download: Release Version

Firefox 3.63.

Looks clunky. Works clunky. Takes forever and 6 months to launch. It’s fast, but not as fast as Safari. The only real redeeming thing about it is the obnoxious amount of add-ons you can install to do virtually anything – which unfortunately makes it look and work even more clunky. Don’t bother with it unless you’re a geek and want all the extra add-ons.
Download: Release Version | Beta Version

Opera 10.52

Interface lacks polish. Just configuring all the options and preferences can take weeks. Speed ain’t all that. Buggy. It basically sucks and you shouldn’t even bother trying it.
Download: Shipping Version

The Rest of them

They all suck, don’t bother.
Download: Really, don’t bother.

04/29/2010 Read More
Free textures: Weathered wood

Free textures: Weathered wood

A small collection of four high-resolution (2,300 x 3,400 pixels) images of a wood door I shot at the Japanese Gardens in Golden Gate Park while I was in San Francisco.

Weathered Wood Textures

Free high-resolution weathered wood textures

I had no real need for them at the time, but I loved the weathered texture and the metal accents. Feel free to use these images for commercial or private use, they are released under the Creative Commons Attribution license.

You can download the weathered wood textures on my Flickr page.

04/28/2010 Read More
Quickly zoom back to 100% in Photoshop

Quickly zoom back to 100% in Photoshop

Simple is always good, especially when you’ve got a full day of Photoshop work ahead of you. Zooming in and out can be tedious, so here are two quick ways to zoom back to 100%.

Double click to zoomFirst, you can double click the Zoom tool in the Photoshop Tools panel. This helps with the finger fatigue of constantly using keyboard shortcuts. That being said, the most dead simple way to zoom back to 100 is to just hit Command + 1.
04/27/2010 Read More
Fontcase offers alternative font management for designers

Fontcase offers alternative font management for designers

FontCase iconAny graphic designer or production artist worth a darn has a multi-gigabyte collection of fonts, many rarely used, just waiting for the perfect job to come along to use them with. The difficult part of having such a large collection is managing it. With nearly 4,200 fonts in my collection, I’ve never run a Mac without a font manager. Since the days of Mac OS 8, I’ve been an avid Extensis Suitcase user. But when the developers of FontCase offered a review license, I decided it was time to take a look at an alternative font manager.

The first thing I noticed about FontCase is it’s gorgeous Mac-like interface. Clearly Bohemian Coding was borrowing from iTunes here. While the overall layout of virtually any font manager is the same, FontCase managed to really make it look good. Everything just “fits” in the Mac GUI. In fact, one could make the argument that FontCase is what Apple’s own Font Book should have been. This is one area I’ve never liked about Suitcase Fusion, it just looks bad. While the appearance of the app has nothing to do with how it performs, for most Mac users it’s still a point of interest.

04/26/2010 Read More
Free textures: Re-stained paper

Free textures: Re-stained paper

Textures are the backbone of so many designs, they can really add flair to your layout, and save you hours of time looking for a substitute design, or shooting your own photos. Lost & Taken has so many great textures available that it would take hours to list them all.

Re-Stained Paper textures

Lost & Taken is one of my favorite texture sites

Re-Stained Paper is just one of many awesome texture packs available for download. The Re-Stained Paper textures measure approximately 2,200 x 3,200 pixels in size, and are free to use for personal or commercial work.

04/23/2010 Read More
A better way to get rounded-corner rectangles in Adobe Illustrator

A better way to get rounded-corner rectangles in Adobe Illustrator

Adobe IllustratorIt’s so easy when you want to create a rectangle with rounded corners in Adobe Illustrator to just click that Rounded Rectangle tool icon in the Tools panel and just click & drag. The problem is, you have no control over those corners once your rectangle is created.

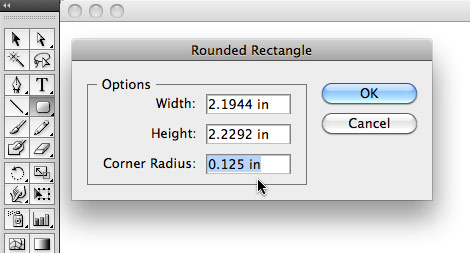
Sure, you could select the Rounded Rectangle tool icon and Option + click to bring up a dialog box allowing you to specify the radius of the corners. But again, once the rectangle is dragged out, that’s it. There’s no going back and changing that radius later, and attempts to resize the rectangle later on actually resizes or stretches the rounded corners.

Illustrator's rounded rectangle tool

Illustrator's rounded rectangle tool isn't the best way to create rounded corners

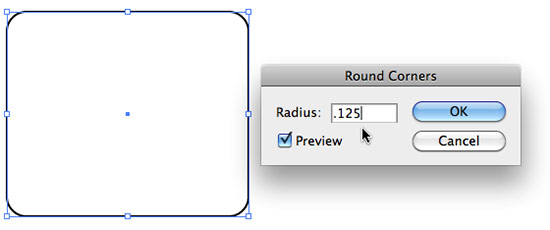
If you want to keep full control over those rounded corners of your rectangle, use the normal squared-edge Rectangle tool icon in the Tools panel. Once your rectangle is dragged out on the page, go to Effect>Stylize>Round Corners… in the menubar.

In the dialog box that appears, you can specify a custom corner radius amount. And here’s the great part. This is an effect applied to the rectangle, not the actual rectangle path.

Illustrator's rounded corner effect

Illustrator's Rounded Corner Effect offers more flexibility with rounded corners

So now when you stretch that original three inch wide rectangle to nine inches wide, the corner radius doesn’t stretch with it, it stays exactly at the amount you specified. As an added bonus, you can go back later and change that radius amount if you wish via a quick visit to the Appearance panel.

04/22/2010 Read More
Free stock photos: Ice Cream Sundae

Free stock photos: Ice Cream Sundae

If you have the need for them, you’re more than welcome to use these high-resolution photos of the most spectacular ice cream sundae I’ve ever had in my life in any way you see fit. If you use it on a website, I would love a credit link back to the Flickr page. I received several email requests for the image after it appeared in my design inspiration post last week.

Ice Cream Sundae 1

Click image to go to download page - choose Original Size

Ice Cream Sundae 2

Click image to go to download page - choose Original Size

Ice Cream Sundae 3

Click image to go to download page - choose Original Size

The images are released under the Creative Commons Attribution license, and the original size download is approximately 3264 x 2448 pixels – plenty large enough for commercial printing.

04/21/2010 Read More