 If you're a Mac OS X user who hasn't upgraded to Snow Leopard yet, but you want more control over the volume and sound output sources, PTH Consulting has a great little app that offers the same functionality as Apple's built-in volume control menubar widget found in Mac OS x 10.6.
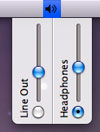
PTHVolume 2 is a menubar application that not only allows you to adjust the volume of your Mac, but offers you the ability to switch the sound output sources without making a tiresome trip to the OS X System Preferences.
 PTHVolume (free) is particularly useful for Mac OS X users who, like me, have a nice set of external speakers set up on their Mac, but also like to use headphones at night or when anyone around you isn't particularly interested in listening to your personal taste in music.
As you can see in the screenshot at the left, you can adjust the volume for each source individually; something you cannot do with Apple's built-in widget in Snow Leopard. Up until Snow Leopard, I was using this utility for a long time with no stability issues at all. It works perfectly.