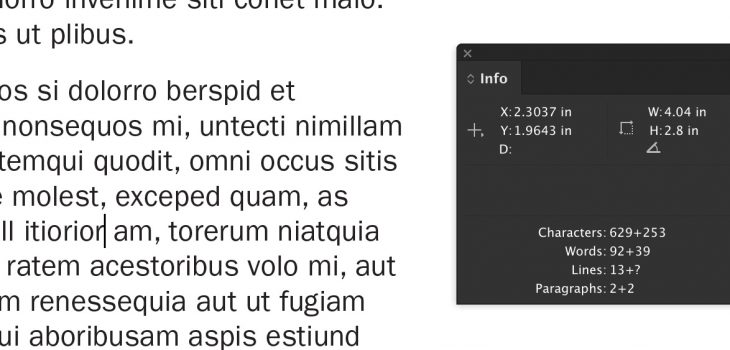
When you have a large image placed inside a small Adobe InDesign Frame and you want to resize the Frame to show the entire image, there’s no reason to do it manually. As with so many of InDesign’s features, there’s a handy shortcut to do the job for you.

A simple double-click will resize an image frame in a variety of ways
Simply select the Frame your cropped image resides in and double-click any corner Frame Handle to quickly resize the frame to fit the entire image placed in it. If you don’t want the entire Frame enlarged, but want the full width of the image to show, double-click one of the side Frame Handles. And of course, if you want to keep the width of the Frame intact, but resize it to display the full height of the image, double-click either the top or bottom Frame Handles to do that.
As you can see in the image above, the photo Frame on the left is cropped, but double-clicking on the Frame Handle on the side resized the Frame to show the full width of the image I have placed inside it.


My first problem is that I get a lot of email. My second problem is that I check my email throughout the day on my iPhone. And my third problem is that I often wish to delete emails without even reading them (thanks to spammers with no grasp of the English language, and horrible PR firms who can’t target the proper sites for their stories in the subject line).
Did you know that you can resize a Mac OS X Finder window when you’re in Column View to fit the widest folder or file name automatically? It’s a simple keyboard shortcut, and can save you a lot of scrolling and manual resizing.