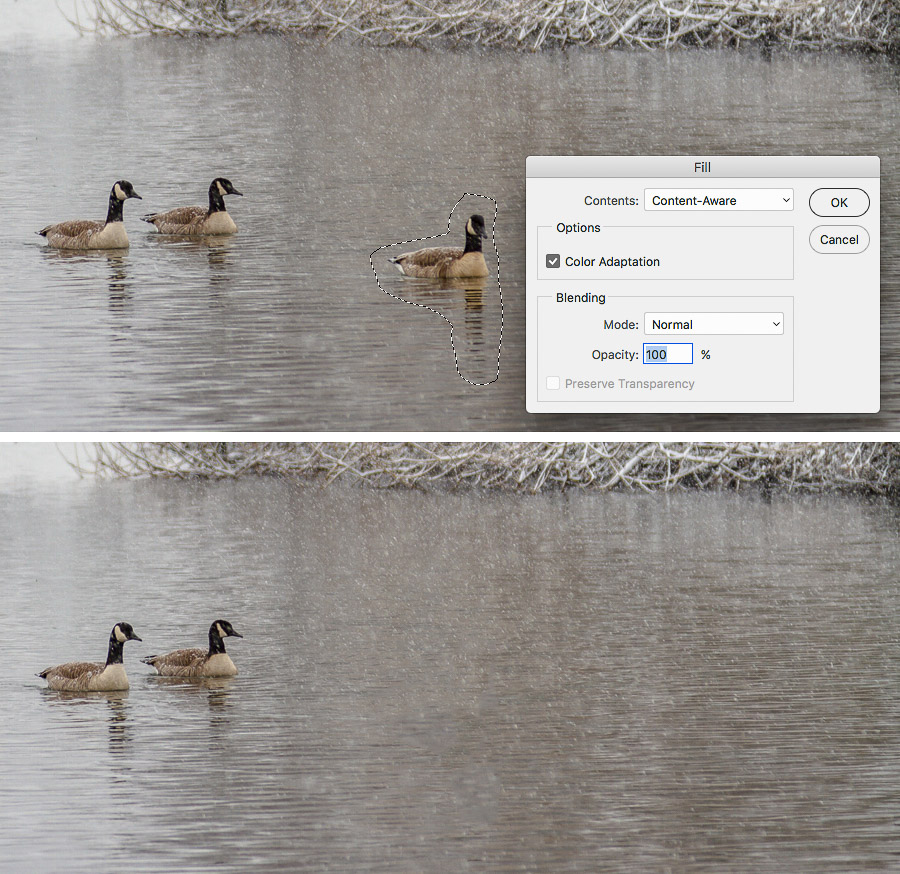
TwitterFacebookRSS

Turn off the color sampling ring in Adobe Photoshop CS5

You may have noticed something new when selecting colors with the eyedropper tool in Photoshop CS5. It’s called the color sampling ring, and it shows you the previously chosen color, as well as the one you’re clicking on in a ring around your cursor. This can be particularly useful if you’re trying to compare colors.

Color sampling ring

Photoshop's color sampling ring in action

However, if you simply don’t like the screen clutter you can turn it off. Just select the eyedropper tool and take a look up in the Control Panel at the top of the screen. You’ll see a checkbox for “Show Sampling Ring” which you can uncheck to make it go away forever.

Speeding up Photoshop CS5

PhotoshopThere is no shortage of advice for users to improve the performance of Photoshop. RAM is always king, the more you have, the better off you are. But having it isn’t enough, you have to know how to manage it.

Here are a few things that have helped me improve performance in Photoshop CS5 (though they’ll most likely work just fine in versions CS3 and CS4 as well).

Memory

Go into Photoshop’s preferences (Command + K) and select the Performance item from the source list on the left. The first thing to adjust is the Memory Usage. I generally keep the RAM set between 60-70% with the slider. This allows me to use a good amount of my RAM for Photoshop, but still leave enough for other apps and the System itself. However, if you have less than 4GB of RAM, you should probably stick to 50% max. Your mileage may vary.

Photoshop performance preferences

Memory use and cache settings improves performance

History & Cache

The next thing to adjust is your History & Cache settings. You can use the preset buttons (hover over them for a brief description of which you should use). Only my laptop, I use the settings you see in the screenshot above. Because I tend to use my laptop for web or other low-resolution work, the settings have worked superbly.

3D VRAM

If you’re running Photoshop CS5 Extended, you can also check the 3D preferences and up the VRAM (video RAM) use to the max amount. I don’t do any 3D work, so I can’t tell you how well this works or not, but I keep it set to the max anyway.

Layers Panel

If you work with a lot of layers in your Photoshop document, you can reduce the size of the individual icon layer thumbnails. The smaller the icon, the less memory Photoshop needs to redraw those thumbnails every time you make a change to a layer. Just make a quick trip to the Layers panel flyout menu and choose the Panel Options… menu item. You can also turn those layer thumbnails off completely if you’re really organized with layer naming.

The Rest

There are numerous other tips that can help speed up Photoshop. Limiting the number of fonts installed and active is huge. You can also limit the number of files Photoshop remembers in the File menu list (adjust in the Photoshop preferences). Keep the layer count down as much as possible goes a long way, and not using Photoshop’s built-in Navigation panel with its giant thumbnail is a great idea as well.

Cool Site: Photoshop Style A Day

If you’re constantly on the lookout for ways to add to your Photoshop toolbox, Styles are a great way to go. Photoshop Styles make styling your text and objects as easy as clicking a button, and keeps them fully adjustable.

Photoshop Style A Day

Photoshop Style A Day offers free downloadable Styles

Photoshop Style A Day is a relatively new site I came across that offers just what the name implies. I’ve downloaded all of the styles currently available, and most are of excellent quality. Now I know what you’re going to say, some of them look kind of cheesy – I won’t argue that. But when you consider that after applying a style, your text or object remains editable, you can go back and tweek it to your heart’s content.

Import/Export Photoshop workspaces with this simple script

If you’re like me and dread the thought of setting up custom workspaces when you install Adobe Photoshop on a new computer, or reinstall it for whatever reason, there is a simple solution.

I have all my Photoshop panels set up on my 30″ LCD in the perfect spot, and my keyboard shortcuts set up the way I prefer, so starting from scratch is a pain.

Thankfully, John Nack (Adobe Photoshop Product Manager) shared a script that one of the Adobe engineers wrote to export and/or import your customized Workspaces. You can download the Workspaces script here. Details can be found in this post on John Nack’s blog.

Understanding bit depth in Photoshop

For the most part, designers don’t really think about bit depth when working in Adobe Photoshop. Bit depth tells Photoshop how many colors an image can contain. As of Photoshop CS5, a maximum of 32-bits can be used. It’s important to have at least a small understanding of what bit depth is and when you should use different bit depths when working with your images.

2-Bit

2-bit images are typically called bitmaps, and they contain only two colors – black or white. This is because the pixel is either turned on or off. For the most part, 2-bit images aren’t used much anymore, but when they are, it’s usually a case of a solid black piece of artwork (such as a logo) that will be colored in a layout program like Quark XPress or Adobe InDesign.

Bit depth differences

2-bit images can be used to enhance an 8-bit image, or used by itself simply as a graphical element in your design

8-Bit

With the exception of some high-end photographers, 8-bit is the most popular bit depth to work in because it provides 16.7 million available colors – which is far more than any human can see. And quite frankly, no inkjet or commercial printer can produce anyway. In 8-bit mode, you can use all the features available in Photoshop.

16 and 32-bit

Photographers typically shoot in camera RAW mode, offering them a higher bit depth. This essentially offers more color information to be stored in the pixels; so when they go into the RAW editor, they have much more flexibility in bringing out the detail in shadows and highlights. The problem with working in 16 and 32-bit images is that you have a very limited set of filters that will work above 8-bit.

In general, you shouldn’t have the need to ever work in anything but 8-bit. But I certainly encourage you to explore color correcting RAW images, and playing with the effect you can achieve using a 2-bit image.

Adobe finally fixes Creative Suite installers

When I installed Adobe Creative Suite 5 Master Collection this past week, the very first thing I noticed was that the installer has been greatly improved over the disasterous installers used in previous Creative Suite versions. Now let me qualify that by saying they still aren’t perfect, but I think most users will agree that they’re well on their way to being what they should have been all along. Simple.

First of all, they actually look like they belong on a Mac. In the past, they screamed of being a Windows port at best. Buttons looked out of place, and the overall layout of the installer options seemed convoluted and overly difficult.

Adobe CS5 Master Collection

Adobe's Creative Suite 5 GREATLY improves the installer application

Furthermore, the install process itself took an obnoxious amount of time to install the apps – and you were likely to end up with an incomplete install if you managed to get around the “Quit all your apps before we proceed warning message.”

CS5 InstallThe new version offers a simple list of icons you can choose to install on the left. On the right, you’re shown components included with the installation of each app you have chosen. You can choose to not install those “optional” components if you wish, but you’ll likely have to do it more than once if you’ve purchased the Design, Web, Production or Master collection. For instance, Adobe AIR is part of the install for more than one app, so turning off the install for one app will simply result in it being installed with another one. To be honest, I don’t think you have any choice in the matter, you WILL have AIR installed.

Another app you’ll have no choice in installing is Adobe Bridge. There’s no way to choose to not install it. That being said, the speed increase and integration with other Creative Suite apps is worth installing it anyway.

Finally, the speed with which the individual applications get installed has been greatly improved. Installing the CS4 Design Premium edition took nearly 7 weeks (or so it seemed). Installing the entire CS5 Master Collection took just over 35 minutes. That’s nearly twice as many apps in significantly less time. And you’re no longer forced to quit your web browser while installation is taking place. Nice!

Quickly zoom back to 100% in Photoshop

Simple is always good, especially when you’ve got a full day of Photoshop work ahead of you. Zooming in and out can be tedious, so here are two quick ways to zoom back to 100%.

Double click to zoomFirst, you can double click the Zoom tool in the Photoshop Tools panel. This helps with the finger fatigue of constantly using keyboard shortcuts. That being said, the most dead simple way to zoom back to 100 is to just hit Command + 1.

Create a shiny globe in Photoshop

In this tutorial at PSDTuts, you’ll learn how to create a shiny globe using the 3D features of Photoshop CS4 Extended. This will cover basic information about 3D layers and texture maps.

Globe tutorial

Learn how to use texture mapping and Photoshop's 3D tools in this tutorial

While you’re probably not running across the need to create Earth globes in your every day workflow, the tutorial will give you the knowledge of using a few of Photoshop’s powerful tools that you probably don’t even think about.